![]() 1st Battalion 22nd Infantry
1st Battalion 22nd Infantry ![]()
The Battle of Kontum
Operations - Phase I & Phase II
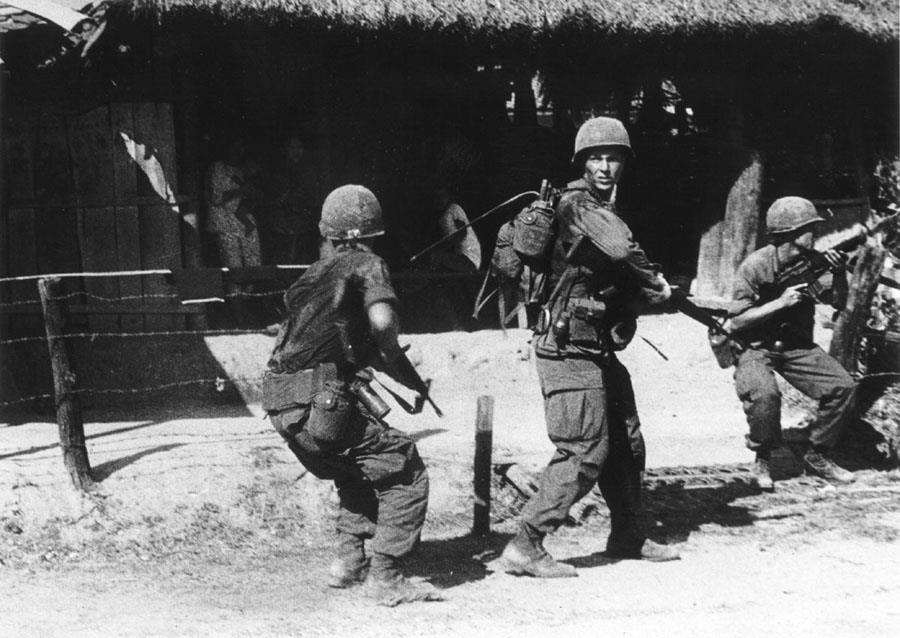
Kontum TET Offensive Feb
1, 1968 - 1/22 IN Soldiers react to sniper fire as they patrol
the streets of
Kontum, searching for members of the 24th NVA Regiment. Ronnie
Colson, RTO, D Company,
is in center, facing toward camera.
Photo by SP5 James Doyle, PIO 4th ID
Around mid-day of January 30
Task Force 1-22 began the retaking of Kontum.
Company B 1/22 INF and elements of 7/17 CAV arrived north of the
city and commenced
search and destroy sweeps in the area to the north of the
airfield. Company A 1/22 INF was airlifted to near the bridge
over the Dak Bla river about 7 pm, where LTC Junk joined them and
set up his Tactical Operations Center.
One platoon of Company A 1/22 INF and the Recon Platoon 1/22 INF
moved across the bridge
and took up positions inside the city. The North Vietnamese again
attacked the airfield but helicopter
gunships drove them off. About 4 am on the morning of January 31
the communists tried to overrun the forces
still holding out in the city. Despite a rocket attack which hit
the ammo dump and destroyed most of their
artillery ammuntion, South Vietnamese forces again repulsed that
attack.
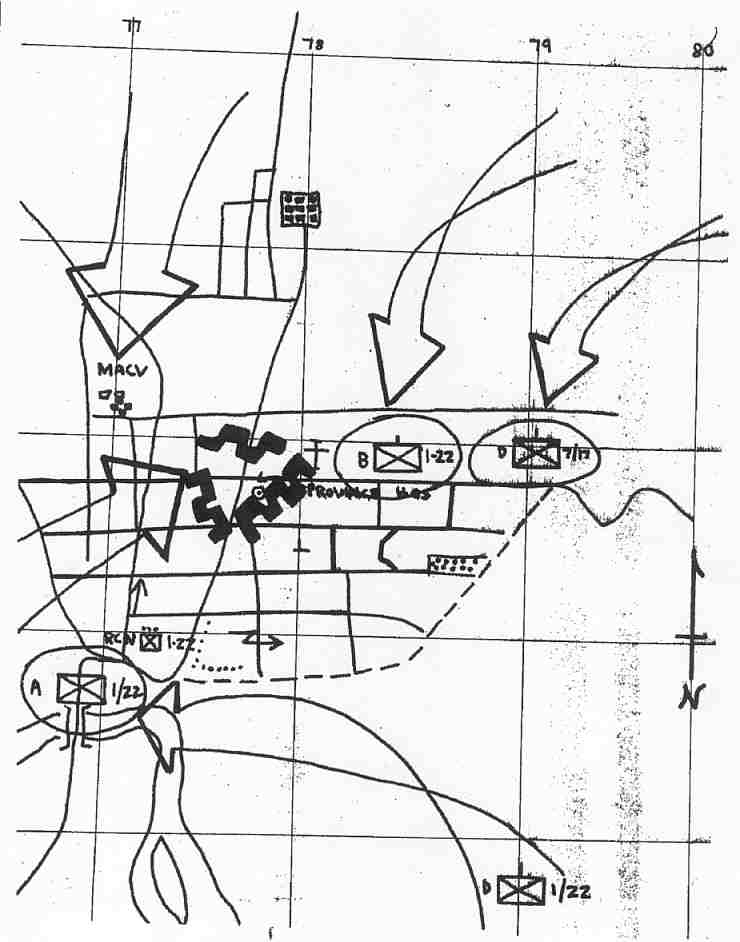
The following diagram shows the
deployment of A 1/22 INF , to secure the bridge on Highway 14,
the sweeps north of the airfield by B 1/22 INF and D 7/17 CAV,
the movement of D 1/22 INF to the bridge
and the movement of Recon 1/22 INF into the city.

The morning of January 31 ARVN
and RF/PF troops entered the city to provide security
for those areas in friendly hands. LTC Junk brought in more
assets of Task Force 1-22.
Team Delta, with elements of 1/69 Armor, broke into small teams
and moved throughout the area,
eliminating pockets of enemy resistance. By the end of the day 65
enemy soldiers had been killed.
That night the NVA again attacked the MACV compound, and again
the attack was repulsed.
On February 1 Company C 1/22 INF was brought into the city and the counterattack began.
"Company
D (1/22 INF), minus one platoon acting as security for the
airfield,
swept the area east of the province chief's house and directed
gunship and tank fire against
Communist strongpoints. As the day went on, it was filled with
bloody house-to-house
fighting. Company B and Task Force Delta cleared the western part
of Kontum and reopened
Highway 14, permitting supply convoys to travel once again
between Pleiku and Dak To.
The Communists resisted fiercely, losing 90 men before retreating
from the western part of the city.
Company
C reinforced the airfield at 1830 that evening. Half an hour
later, the Communists
initiated light ground probes against the airport's perimeter.
North Vietnamese soldiers also attacked
the north side of the advisory compound, but the allied defenders
drove them back.
Shortly after midnight, the Communists halted their attacks but
kept up a steady fire
that lasted into the morning, using automatic weapons and mortars
and firing several 122mm rockets.
At 9:30
a.m. on February 2, Junk ordered Company D to flush out the
Communists hiding in the camp's
Prisoner Interrogation Center and Language Institute northeast of
the advisory compound.
When the 1st Platoon moved into the center of the complex,
however, the North Vietnamese
caught them in a deadly ambush. As the headquarters and 2nd
Platoon tried to extricate the
pinned-down men, several of them wounded, Junk ordered Company C
to move
from the southern part of the city to help.
The
momentum of the battle shifted shortly after noon, when Company C
reached the advisory compound.
Accompanied by two M-48 tanks and an armored personnel carrier
from Troop A, 2nd Squadron,
1st Cavalry Regiment, the force gave Company D time to pull back
and regroup by taking the
Language Institute under fire. The company would later claim it
had killed 47 of the enemy in the attack.
The
Communists began to show signs of panic. Fearing they would be
trapped, about 100
North Vietnamese soldiers hiding in the Prisoner Interrogation
Center fled, heading west
across an open field. Companies C and D plus the three armored
vehicles opened fire, killing most of them." ¹
|
2nd LT John J. Culp of
Battery B 4/42 Artillery, |
Companies B and D 1/12 INF were
airlifted from Dak To that day, and brought north of the
airfield.
On February 3 the enemy realized their hope to control Kontum was
gone. Those NVA who had not
already left the city broke up into small groups and began to
retreat as best they could.
By February 4 only a handful of communists were left in the city;
the majority of enemy forces still in the area
were regrouping to the north.
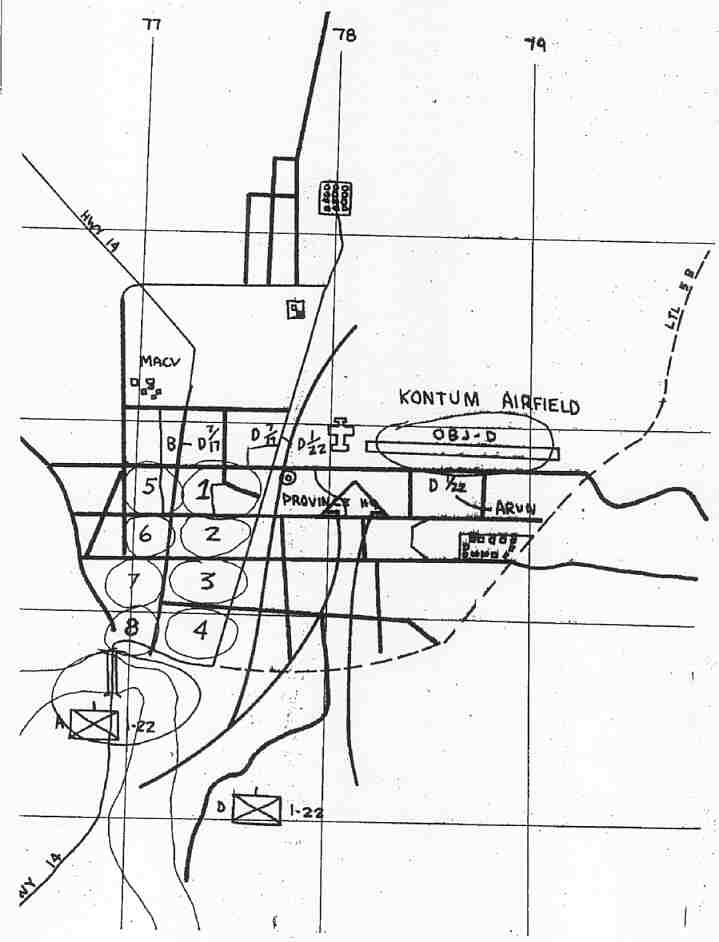
The following diagram shows the beginning of Phase II, as US and ARVN units began to push the enemy out of Kontum.
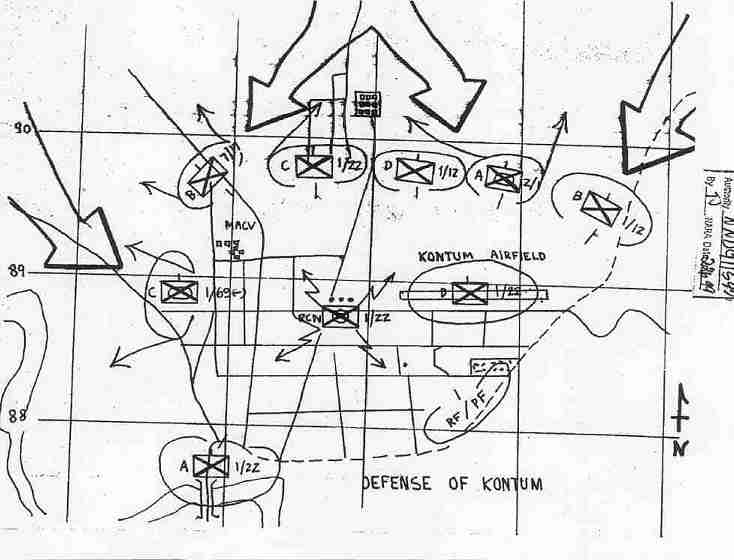
The following diagram shows the
result of the 4-day battle for the city proper, as C 1/22 INF
and other units were committed, and the enemy was forced north,
out of the city into the countryside.
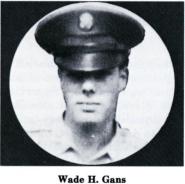
Specialist 4 Wade H. Gans
SP4 Wade Gans was a machine
gunner in 2nd Platoon Company C 1/22 Infantry
during the Battle of Kontum. He was awarded the Silver Star Medal
and Purple Heart Medal
for his actions on February 2. The citation for his Silver Star
reads:
"For gallantry in action
while engaged in military operations against an armed hostile
force
in the Republic of Vietnam. Specialist Gans distinguished himself
while serving as a Machine Gunner
with Company C, 1st Battalion, 22nd Infantry, 4th Infantry
Division. On 2 February 1968
as North Vietnamese forces were attempting to maintain an
offensive, Specialist Gans' company
acted as a relief force to destroy enemy resistance in the city
of Kontum.
Despite intense enemy small arms fire, Specialist Gans
voluntarily assaulted many insurgent positions,
neutralizing most of them with hand grenades and automatic
weapons fire.
Although wounded during the engagement, he continued to direct
suppressive fire against the enemy
and encourage his men. His exceptional skill and brave acts were
an inspiration to the men
of this company and saved many of their lives. As a result of his
aggressiveness and determination,
the enemy suffered losses in both men and equipment. Specialist
Four Gans' gallantry, fortitude
and exemplary devotion to duty are in keeping with the highest
traditions of the military service
and reflect great credit upon himself, his unit and the united
States Army." ²
**********************
¹ Battle
For Kontum by Erik B. Villard
VIETNAM Magazine, Volume 15 Number 5 pp. 32-33
February 2003
² 4th Infantry
"Ivy" Division Steadfast and Loyal
Turner Publishing Company 1987
Home | Photos | Battles & History | Current |
Rosters & Reports | Medal of Honor | Killed
in Action |
Personnel Locator | Commanders | Station
List | Campaigns |
Honors | Insignia & Memorabilia | 4-42
Artillery | Taps |
What's New | Editorial | Links |