![]() 1st Battalion 22nd Infantry
1st Battalion 22nd Infantry ![]()
The Battle of Kontum
Operations - Phase III
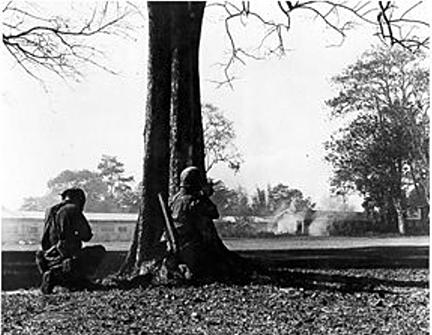
Kontum TET Offensive Feb
1, 1968 - House to house fighting by A Co., 1/22 IN.
M-79 rounds being pumped into the low building with one in
flight.
Photo by SP5 James Doyle, PIO 4th ID
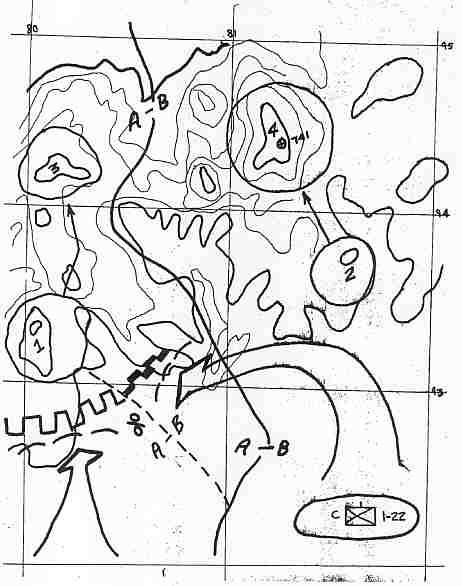
Though the enemy had left the
city of Kontum, LTC Junk knew they had not left the area of
operations.
He designated areas of possible withdrawl by the communists, and
sent his forces into these areas
with the purpose of finding the fleeing enemy.
The following diagram shows the suspected areas of the enemy's withdrawl, which were designated as areas of operation.

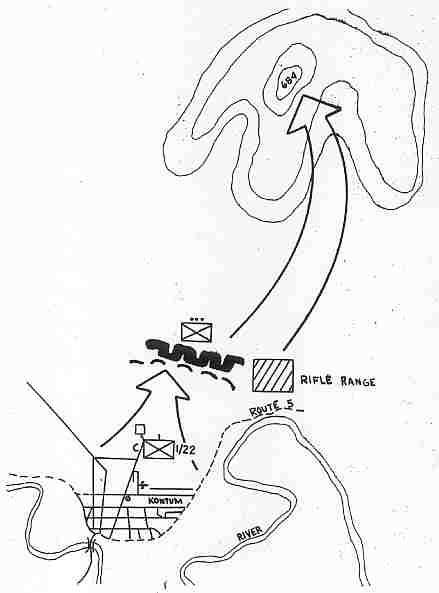
Company C 1/22 INF was searching
in the area to the northeast of the city, when on February 5
it met the North Vietnamese head-on:
"
At 1:30 p.m., Company C encountered an enemy force about 1,500
meters south of Hill 684.
Suspecting that he had located at least part of the 24th PAVN
Regiment, Junk reinforced Company C
with Company A and four M-48 tanks and began to call in
artillery, airstrikes and gunships.
The fighting lasted into the evening. By the time the North
Vietnamese broke contact,
Company C had suffered six men killed and 12 wounded, and Company
A lost one killed
and three wounded. Enemy casualties were unknown. The two U.S.
units pulled back
to Kontum for the night." ¹
The following diagram shows the
engagement of Company C 1/22 Infantry, with an enemy force
estimated to be
of Company size, in the area immediately to the northeast of the
city. The fight lasted for six hours,
and the enemy withdrew in the direction of Hill 684.
On February 6 Task Force 1-22
began the attack on Hill 684. Company A 1/22 INF and
Company B 1/22 INF were to move abreast and take their
objectives. Company A had Objective 1,
which was Hill 684. Company B had Objective 2, which was Hill
721, high ground about one kilometer to the
east of Hill 684. Company C 1/22 INF was held to the south, in
reserve.
"
The attack began at 7:30 a.m. on February 6, following airstrikes
and a preparatory artillery barrage.
At first, the Americans met little opposition. At 10:35 a.m.,
however, Company A ran into a hail
of small-arms fire, mortar rounds and B-40 rockets coming from
well-protected, concealed bunkers
on Hill 684. In response, Junk ordered Bravo Company to move west
from Hill 721 and join the battle.
Linking up with the right flank of Company A, the unit threw its
weight against
the North Vietnamese, but intense fire once more stopped the
assault. When the commander
of Company A went down with an incapacitating wound, Junk ordered
both companies to pull back
while airstrikes and artillery bombarded the enemy position. The
Americans resumed the attack
at 1:18 p.m., but pulled back 15 minutes later after taking more
casualties." ²
The rest of February 6 was spent
with sporadic contact. By the end of the day 1/22 Infantry
had lost four KIA, 17 wounded and one MIA, while killing eleven
enemy soldiers.
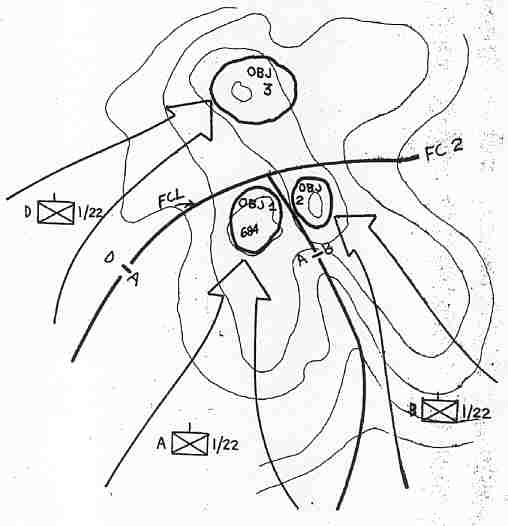
The following diagram shows the
attack on Hill 684 (Objective 1) by 1/22 Infantry,
with Company B diverting from its assigned objective and joining
Company A in the assault,
and Company C in support.
Because of the heavy resistance
of the North Vietnamese on Hill 684, LTC Junk devised a plan of
attack
for February 7, in which Companies A and B 1/22 INF would repeat
their frontal assault on Hill 684,
while Company D 1/22 INF, joined by tanks from 1/69 Armor, would
circle to the west and seize the high ground
to the north of Hill 684, trapping the enemy in a pincer
movement.
On the morning of February 7
airstrikes and artillery pounded Hill 684 with cluster bombs,
tear gas and napalm.
LTC Junk's plan of attack was carried out, with the addition of C
1/22 INF moving to the east to block
a possible avenue of escape, and Company A 1/12 INF joining in
the frontal attack on Hill 684.
Most of the communist forces had abandoned the hill, and by the
time elements of Task Force 1-22
occupied the summit, it was found to be deserted.
During the next five days
intermittent contact was made with the enemy, until by February
12
it was apparent that the North Vietnamese had broken contact and
the battle for Kontum was over.
The following diagram shows LTC
Junk's plan of attack of February 7, on Hill 684 and its
surrounding terrain features,
to be carried out by Companies A, B and D 1/22 Infantry.
¹ Battle
For Kontum by Erik B. Villard
VIETNAM Magazine, Volume 15 Number 5 p. 33
February 2003
Actually eight Soldiers
from Company C were killed on February 5.
Altogether during the battle seventeen Regulars from 1st
Battalion lost their lives.
² Ibid., p.64
Home | Photos | Battles & History | Current |
Rosters & Reports | Medal of Honor | Killed
in Action |
Personnel Locator | Commanders | Station
List | Campaigns |
Honors | Insignia & Memorabilia | 4-42
Artillery | Taps |
What's New | Editorial | Links |